

This is the second part on my Series on Google Apps Script advanced projects.
See the first part of the article here. In the first part, we used ES6 and npm modules in the server side of Google Apps Script.
In this article, we will move on to the client-side. We will create a Single Page Application (SPA) and will make use of Bootstrap and VueJS.
Get the sample project
First, clone the sample project here:
https://github.com/gsmart-in/AppsCurryStep3
Clone the project:
git clone git@github.com:gsmart-in/AppsCurryStep3.git
We will use the clasp command line tool to manage the Apps Script project. Install clasp if you don’t have already.
Then log in to your Google Account
clasp login
go to the AppsCurryStep3 folder and do:
cd AppsCurryStep3

clasp create --type standalone --title "Apps Script Single Page App Example"
This will create a new “standalone” Apps Script Project in your account.
Then run the following commands to upload the sample code to your new Apps Script project.
npm install
npm run deploy
When the script asks you to upload appscript.json press y and enter
Once the script is uploaded, it will open your browser and show you the Apps Script page.

You can’t have separate CSS or Javascript files in Apps Script
What I mean is that you can’t upload a Javascript file and include it in the HTML using the <script> tag in your standalone Apps Script project. All CSS and JS code should be inlined.
The solution is to use html-webpack-inline-source-plugin. This webpack plugin just inlines the compiled JS and CSS into the generated HTML file. So the HTML file becomes a large blob of everything for the APP. Making it not only a Single Page App but also a Single File App!
Here is the configuration in the client/webpack.prod.js
const path = require('path');
const merge = require('webpack-merge');
const common = require('./webpack.common.js');
var webpack = require('webpack');
const HtmlWebpackPlugin = require('html-webpack-plugin');
const HtmlWebpackInlineSourcePlugin = require('html-webpack-inline-source-plugin');


module.exports = merge(common, {
	mode: 'production',
  output: {
     filename: '[name].bundle.js',
     path: path.resolve(__dirname, '../deploy/gas')
    },
    plugins: [
     new webpack.ProvidePlugin({
          $: 'jquery',
          jQuery: 'jquery',
          'window.jQuery': 'jquery'
     }),
     new HtmlWebpackPlugin({
     	  template: 'client/src/index.html',
        inlineSource: '.(js|css)$'
     }),
     new HtmlWebpackInlineSourcePlugin()
   ]
});
The Front End Packaging Setup
If you look in the code, the client folder contains everything for the UI front-end. The index.html is the main page of the Single Page Application. The App uses vue-router to display multiple sections of the app. The sub-pages are Single File vue components under client/pages folder.
Webpack compiles all the scss files, the vue and javascript files and bundles it all into an index.html file and puts it the deploy folder. From there, we upload the code to GAS using the clasp command line tool

Local Testing
You don’t have to build and upload to GAS every time you want to try a change. The local server can display the UI changes.
For local testing, the webpack-dev-server displays the index.html file in the browser. All the UI features work just fine when you run
npm run local
The only difference is that the back-end is ‘mocked’ .
Mocking the BackEnd
In order to make the local server possible, we have an abstraction of the back-end. See the BackEndWrapper class. Depending on whether we are running locally or in Google Apps Script, the BackEndWrapper routes the calls to the corresponding back-end.(Mock server or the GAS back end)
The MockBackEnd just imitates the behavior of our Apps Script API. For this starter project, we just return some random numbers from the back-end. Remember (refer to the first part of the article), we used lodash in the server side to generate those numbers.
see client/src/services/MockBackEnd.js
'use strict';

class MockBackEnd
{
	constructor()
	{

	}
	getRandomNumbers()
	{
		return this.later([12,33,45,2,3,11,56,66]);
	}
	later(value)
	{
		return new Promise(function(resolve)
		{
			setTimeout(function()
			{
			    resolve(value);
			}, 500);
		});
	}
};

export default MockBackEnd;
When you run the app locally, the MockBackEnd returns the response. When we deploy and run from Apps Script, the Apps Script back-end sends the response.
look at the GASBackEnd client/src/services/GASBackEnd.js
'use strict';

class GASBackEnd
{
	constructor()
	{

	}
	getRandomNumbers()
	{
		return new Promise(function(resolve,reject)
		{
			google.script.run.withSuccessHandler(function(res)
			{
				resolve(res);
			})
			.withFailureHandler(function()
			{
				reject();
			}).getRandomNumbers();
		});
	}
}

export default GASBackEnd;
Getting Real: Creating a Single Page App with Google Sheet as the back end!
So far we used just simple functions to show the fundamentals of using Javascript tools with Apps Script. Now let us try building a more real-life app using this framework.
Let us build a “Request Management” App. The app will be a Single Page App. You will be able to create new requests (for Laptops, phones, etc) and an admin can view, approve or reject those requests. In the back-end, the app will add the requests to a Google Sheet. So Google Sheet acts as a database.
Here is the complete project:
https://github.com/gsmart-in/AppsCurryApp
When deployed, the app will look like this:
Creating an instance of the “Request Management” App
First, clone the project locally
git clone git@github.com:gsmart-in/AppsCurryApp.git
Go to the AppsCurryApp folder and do these steps to run a local server.
cd AppsCurryApp

npm install

npm run local
Remember, this is only to see the UI and it uses Mock data.
In order to deploy to Google Apps Script, first, you need to create the Google Sheet that we use as the back-end database.
Open this Google sheet here and make a copy of it
(File -> make copy)
Purchase Requests Google Sheet
Then copy the URL of your new Google sheet.
Open the file AppsCurryApp/server/src/api.js
Update the URL of the Google sheet and save the file.

Now we are ready to deploy the app.
Run these steps:
clasp login

clasp create --type standalone --title "Apps Script Request Management App Sample"

npm install
npm run deploy
The script might ask you whether you want to upload the appsscript.json (replacing the existing one) You can confirm by pressing y
You can’t yet run the App. You have to approve the permissions first. This is because this app needs to open and update the Google sheet.
Go to https://script.google.com/
Click on MyProjects and find the project with title “Apps Script Request Management App Sample”
Open the project
From the menu select Publish -> Publish as web app
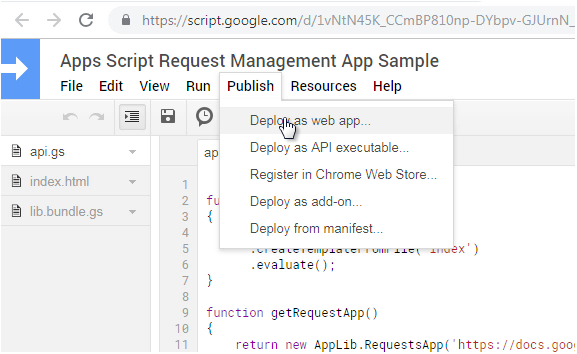
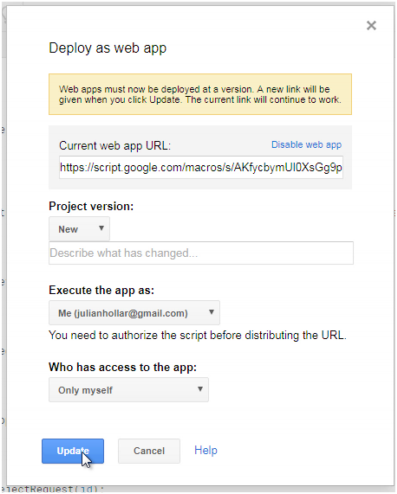
Press the update button. When the “authorization” popup comes up, follow the sequence and provide the permissions.
Once the permissions are provided, select the menu item “Publish -> Publish as web app” again then click on the link “test the web app for your latest code”
You should see the Request management app in a new browser tab.
Try adding new requests and approving existing ones.
See the demo here
Exploring the code
The code is divided into two sections: “client” and “server”. The client folder contains the Vuejs, SCSS and the index.html template We combine all these together to create the bundle that is the index.html file that gets uploaded.

See the client/webpack.prod.js to see the details of the setup.
The server folder contains the code that runs in Apps Script. The code in ES6 gets compiled to Apps Script compatible code and gets uploaded.
The server folder also contains unit tests for the server side code
Conclusion
The purpose of this project was to see how far we can extend the limitations of Apps Script to make it a platform for building complete web apps. Although you can’t build production grade or even limited user base apps on this platform yet, this throws some light on the potentials of such a platform. Imagine being able to create apps, push it and never need to worry about the scaling issues. Imagine a platform that comes ready with user access management built-in. Maybe, one day, this example will help create such a better, scalable universal app platform.