

Google’s Apps Script should be of interest to all JavaScript developers.
Apps Script is good for automation. Through it, you can directly access Google’s many services, such as Google Sheets, Gmail, Google Docs, Google Calendar, and more.
With a little bit of imagination, you can create very exciting Apps and add-ons using Google Apps Script.
Unlike AppEngine, which first asks you for your credit card, Apps Script remains free so far. At the very least, Apps Script is good for quickly creating “proof of concept” mockups or even prototypes.
There are different use cases for Apps Script. Primarily, it can be used to create add-ons for Google Sheets, Docs, or Forms. However, it can also create “standalone” web apps.
We will explore the standalone web app option in this article.
Although there is much to be excited about with Apps Script, it nonetheless has some very painful limitations
- Apps Script supports a very old version of JavaScript (JavaScript 1.6). Many of the modern JavaScript features that you may want to use are thus not available in Apps Script.
- There is no direct way to use npm modules (it is still possible, though, and I will show you how).
- It is quite difficult to create a good UI (with bootstrap, Vue, or even custom CSS). We have to find ways to inline custom script into HTML pages.
- You get a long, ugly URL as the address of your web app. It is difficult to share, and forget hosting a commercial offering on such an address.
- The “Apps Script” is rather painful. The correct name, by the way, is indeed “Apps,” followed by a space, then “Script.” There couldn’t be a less imaginative name for the thing. Some may like the name, but I’ve yet to meet anyone who claims to love it! Your hate will intensify when you start googling for an Apps Script function reference or example. There is a somewhat popular abbreviation: GAS (Google Apps Script). However, I really doubt whether even Google itself will be able to figure out what you mean if you search “use GAS in sheets.”
This article series is my attempt to circumvent Apps Script’s limitations and add some cool awesomeness to “standalone” web apps and add-ons.
First, we will use webpack and babel and create a bundle from ES6 Javascript code. In the next step, we will use npm packages in our Apps Script project. And in the next part of the series, we will develop modern UIs that make use of CSS frameworks and VueJS or ReactJS in your Apps Script project. Let’s dive into it!
Setting up your local Apps Script Environment
First, you have to get familiar with the Apps Script environment. Google provides a command line tool called clasp to manage Apps Script Projects locally.
Install clasp command line tool:
npm install @google/clasp -g
Once installed, login to your Google account.
clasp login
This will open an authorisation page in your browser. You have to complete the steps.
Once these steps are done, you are ready to create your first Apps Script Project.
A simple Apps Script “stand alone” web app
Create a new folder. Open terminal and go to the new folder. Run the following command to create a new Apps Script project:
clasp create --type standalone --title "first GAS App"
Create a new file app.js in the same folder. Add the following function in app.js file:
function doGet()
{
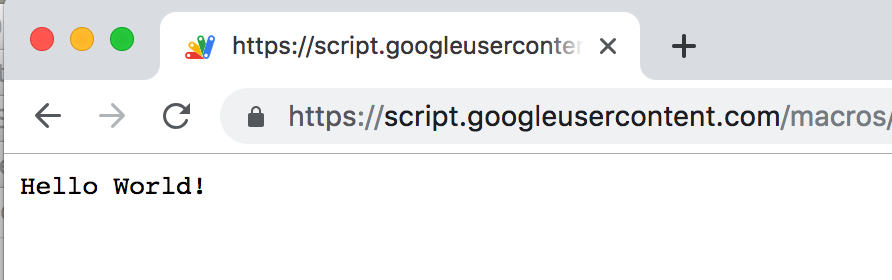
return ContentService.createTextOutput("Hello World!");
}
For a webapp type Appscript project you need to have a function named doGet(). doGet() is the function that does the rendering of the webpage.
In the example above, the output is a simple text. A common webapp should return a complete HTML page. We will go with the simple text for keeping this first project as simple as possible.
Open appscript.json. This file contains the settings for your apps script project.Update the file as shown below:
{
  "timeZone": "America/New_York",
  "dependencies": {
  },
  "webapp": {
    "access": "MYSELF",
    "executeAs": "USER_DEPLOYING"
  },
  "exceptionLogging": "STACKDRIVER"
}
Save the files.
Go to the terminal and enter the following command to push the files back to Google servers:
clasp push
Then enter the following command to open the project in the browser
clasp open --webapp
This should open your browser with your new web app.
Creating the Bundle – using WebPack and Babel
Our next step is to use ES6 in Apps Script. We will use babel to cross compile from ES6 and will use webpack to create a bundle from the generated code.
I have a sample Apps Script Project here:
https://github.com/gsmart-in/AppsCurryStep1
Let’s look into the project structure.
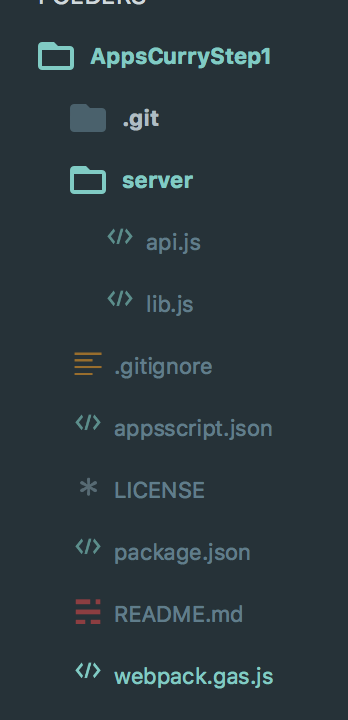
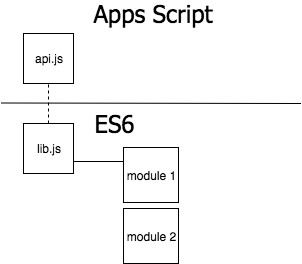
The “server” sub-folder contains the code. api.js file contains the functions that we expose to Apps Script.
In the file lib.js we have es6 code. From this lib module, we can import other es6 files and npm packages.
We use webpack to bundle the code and babel to do the cross compilation.
Let us now look at the webpack.gas.js file:
This is the webpack configuration file. In summary, what this configuration file tells webpack is
- Compile the server/lib.js file in to Javascript compatible with old Javascript using babel. Then place the bundle in a folder “dist”
- Copy the file api.js without any change to output folder ‘dist’
- Copy some configuration files (appsscript.js and .clasp.json to the output folder ‘dist’)
One important thing to notice is these lines:
module.exports = {
  mode: 'development',
  entry:{
      lib:'./server/lib.js'
  },
  output:
  {
    filename: '[name].bundle.js',
    path: path.resolve(__dirname, 'dist'),
    libraryTarget: 'var',
    library: 'AppLib'
  }
}
This means that webpack will expose a global variable AppLib through which you can access the classes and functions exported in the bundle.
Now see the file api.js.
function doGet()
{
	var output = AppLib.getObjectValues();
	return ContentService.createTextOutput(output);
}
See server/lib.js file
function getObjectValues()
{
	let options = Object.assign({}, {source_url:null, header_row:1}, {content:"Hello, World"});

	return(JSON.stringify(options));
}

export {
    getObjectValues
};
We are using Object.assign() which is not supported by Apps Script. When babel cross-compiles lib.js, it will generate compatible code that works on Apps Script.
Let us now see package.json
{
  "name": "AppsPackExample1",
  "version": "1.0.0",
  "description": "",
  "main": "index.js",
  "scripts": {
    "gas": "webpack --config webpack.gas.js ",
    "deploy": "npm run gas && cd dist && clasp push && clasp open --webapp"
  },
  "keywords": [],
  "author": "",
  "license": "MIT",
  "devDependencies": {
    "@babel/core": "^7.4.0",
    "@babel/preset-env": "^7.4.2",
    "babel-loader": "^8.0.5",
    "copy-webpack-plugin": "^5.0.1",
    "webpack": "^4.29.6",
    "webpack-cli": "^3.3.0"
  },
  "dependencies": {
    "@babel/polyfill": "^7.4.0"
  }
}
When you run
$> npm run gas
Webpack compiles and bundles the lib.js code (and any additional modules you have imported) in to a single javascript file and places it in the “dist” folder.
Then we can just use “clasp” to upload the code .
See the script “deploy” in package.json.
It runs webpack , then does “clasp push” and “clasp open”
Deploying “AppsCurryStep1”
If not done, clone the sample project repository locally
git clone git@github.com:gsmart-in/AppsCurryStep1.git
Open terminal and go to the folder AppsCurryStep1
run the following command
clasp create --type standalone --title "Apps Script with Webpack and babel"
This will create a standalone script project in your account
Now run :
npm run deploy
This will open your web app in your browser
Integrating npm modules with your Apps Script Project
One of the limiting features of Apps Script is that there is no easy way to integrate npm like packages to your project.
For example, you may want to use momentjs to play with date, or lodash utility functions in your script.
There, indeed, is a Library feature in Apps Script but that option has several limitations. We will not explore the library option of Apps Script in this article; we will install npm modules and bundle those modules using webpack to create an Apps Script compatible package.
Since we already started using webpack to create bundles that we can integrate to apps script, it should be easier now to add some npm packages. Let us start with momentjs
Open terminal, go to the AppsCurryStep1 folder you created in the last step and add momentjs to the mix
npm install moment --save
Now let us use some momentjs features in our Apps Script project.
Let us add a new function in lib.js
import * as moment from 'moment';
function getObjectValues()
{
	let options = Object.assign({}, {source_url:null, header_row:1}, {content:"Hello, World"});

	return(JSON.stringify(options));
}

function getTodaysDateLongForm()
{
	return moment().format('LLLL');
}

export {
    getObjectValues,
    getTodaysDateLongForm
};
Hint: Don’t forget to export the new function
Now let’s use this new function in api.js
function doGet()
{
	var output = 'Today is '+AppLib.getTodaysDateLongForm()+"\n\n";

	return ContentService.createTextOutput(output);

}
Go to the command line and enter
npm run deploy
The updated script should open in the browser and print today’s date
There is not much fun getting todays date. Let us add another function that has a little more to do
function getDaysToAnotherDate(y,m,d)
{
	return moment().to([y,m,d]);
}
Now in api.js update doGet() and call getDaysToAnotherDate()
function doGet()
{
	var output = 'Today is '+AppLib.getTodaysDateLongForm()+"\n\n";
	output += "My launch date is "+AppLib.getDaysToAnotherDate(2020,3,1)+"\n\n";

	return ContentService.createTextOutput(output);
}
Next, let us add lodash to the mix
First , run
npm install lodash --save
Let us add a random number generator with the help of lodash
function printSomeNumbers()
{
	let out = _.times(6, ()=>
	{
		return _.padStart(_.random(1,100).toString(), 10, '.')+"\n\n";
	});

	return out;
}
Let us call this new function from api.js
function doGet()
{
	var output = 'Today is '+AppLib.getTodaysDateLongForm()+"\n\n";
	output += "My launch date is "+AppLib.getDaysToAnotherDate(2020,3,1)+"\n\n";
	output += "\n\n";
	output += "Random Numbers using lodash\n\n";
	output += AppLib.printSomeNumbers();
	return ContentService.createTextOutput(output);

}
Deploy the project again
npm run deploy
You should see the random numbers in your web app page online
The source of this part 2 (integrated with npm module) is available here:
https://github.com/gsmart-in/AppsCurryStep2
Next steps
Now that it is so easy to add npm packages to your Apps Script project, we can start making some npm packages
Packages that wrap the Google APIs, Gmail, Google Sheets, Google Docs, other public APIs Oh we are going to have lots of fun!
Another important half is remaining though. So far we have seen only a simple text interface for our web apps. How about using modern CSS frameworks, bootstrap, bulma, material design, and also VueJS, React and building some single Page Web apps on Apps Script? Yeah, we will do it. We will use bootstrap, Vuejs in client side and Apps Script on server side and will build a single page app.
How exciting is that? Stay tuned for the next part of this series
Updates
In the second part, we will build the client side of the web app using bootstrap and VueJS. Read the whole story here:
Building Single Page Apps (with Vue and Bootstrap) on Google Apps Script